How
to produce a new cork float for a vintage vehichle.
Hvordan
man laver en ny svømmer af kork til et veteran køretøj.
The
modern petrol is extremely aggressive and the addition of alcohol/methanol has
made this even worse. The float for my 1923 Nimbus “stovepipe” (Nimbus
kakkelovnsrør) suddenly gut stuck and it turned out that the float had swollen
to an extent where is was bigger than the float chamber. The original cork
float though survived almost 90 years gave up after just one summer with modern
petrol. Originally the float was covered with shellac but this is getting dissolved
in the new petrol types with ethanol and thus petrol gets into the cork and the
float will swollen.

There
are a number of remanufactured floats on the market in the material Nitrophyl
which is 100% resistant toward ethanol so first choice is to obtain one of
those if possible. However if the float in question is not reproduced in
Nitrophyl or you need to get a fast solution (or are on the road) you need an
alternative. For my Nimbus no Nitrophyl floats are available ‘over the shelf’
and even though the carb is very much inspired by an American Schebler the
floats are different in size. So I needed to build on myself. For the Nimbus
the float is circular and this is step-by-step how I build a copy :
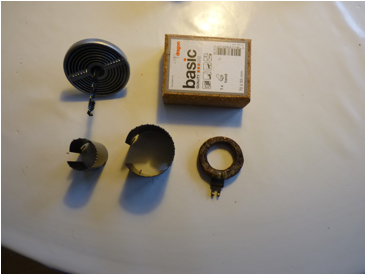
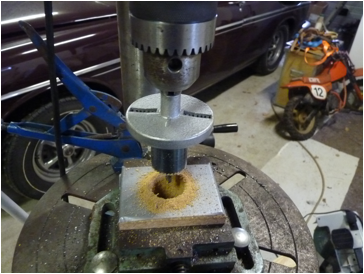
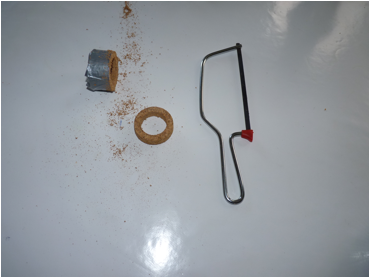
Picture
one shows what you basically need besides what you normally have in the garage:
·
A
pressed cork brick for sandpaper from a DIY shop. Find the one with the finest
structure.
·
A hole saw of
the cheap type with different sizes of blades. Often found on offer in DIY
shops. The finer the teeth the better !
·
A fine saw,
·
Some duct tape.
·
Some super
glue.
Start
by wrapping the cork brick in duct tape to prevent the surface to be destroyed
when the hole saw is applied.
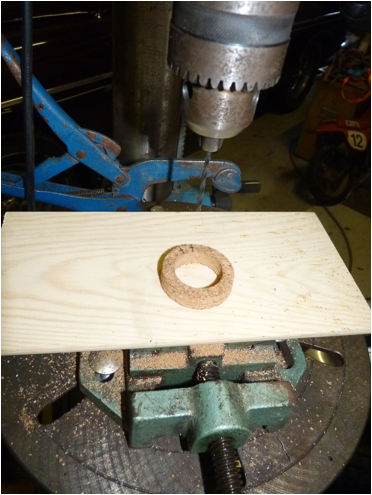
Now secure
the cork brick firmly in a drilling machine. On the picture is seen that I bolt
the vice to the machine and secure the brick between the jaws.
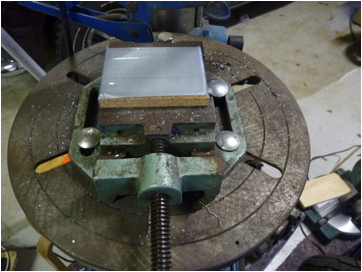
The
cork brick is not going to be moved until the drilling is finished. Start by
selecting a hole saw blade suitable for the INNER hole in the float and install
this in the drilling machine and send it though the brick using a relatively
fast speed on the drill.
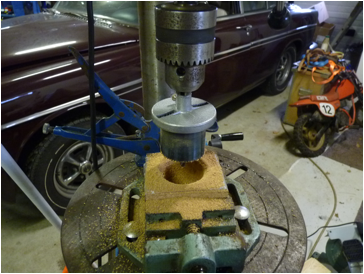
WITHOUT
disturbing the brick in the vice change the hole saw blade with a diameter
suitable for the OUTER diameter. As you leave the vice undisturbed the center
will remain the same so we will get a perfect circle cut as seen on the pictures.
Now we
need to slice the circle piece into the right thickness. Please notice that
most of these cork bricks are made of several layers and with a bit of luck you
can cut along the layers to make the float stronger. Again wrap the cork in
duct tape before the saw is used and note that the saw should have fine teeth.
I used a small saw for metal but a small round saw on a Dremel machine might be
better ?
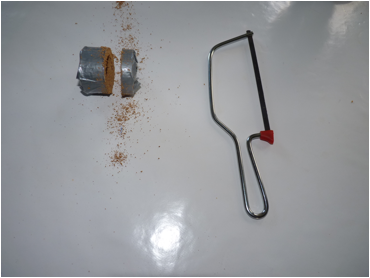
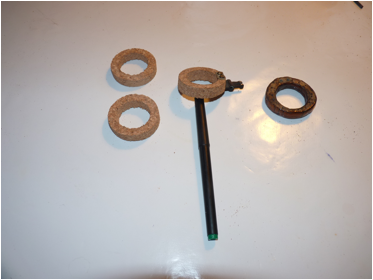
From my
cork brick I got 3 new floats. A suitable amount of floats as I would like to
have one for the toolbox and one at home case anyone needs help. Carefully
remove the duck tape and sand the floats carefully to make the surface smooth.
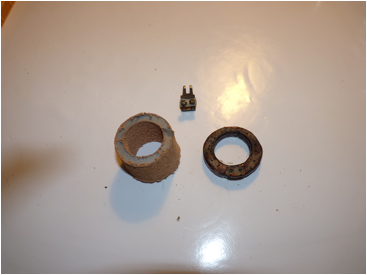
Now it
is time to drill the holes for the needle valve activator. They were carefully
marked and drilled in the drill machine.
Now it
is important to test the float in the carb – not with petrol !!! –
but simply to see if it operates smoothly and that the height seems to be
similar to the original float. So install the original and measure the height
from bottom position to fully closed position. And do the same with the new
float and check if it operates at around the same measurements. It is still to
early to do this in detail as we don’t know the weight/volume ratio of the new
float compared to the old one but we get a indication whether we are on the
right track.
Now we
are ready to coat the new float. I have heard that some people use nail polish
and some use Super Glue. Super Glue is based on Cyanocrylate (check the
package) and this should be the safe way to go ! Cyanocrylate is 100% resistant
towards petrol, Ethanol and other additives used.
To
check the other alternative – the nail polish – I took the bucket
of nail polish from my daughter (when she was not home) and applied some
different brands and colors (there were plenty to choose from) and applied a
drop on a strip of cork and put this into petrol. One hour later is was clear
that most of the drops were dissolved and only one or two drops seemed to
resist the petrol. So if you go for nail polish : TEST IT carefully. But the
safe method is Super Glue.
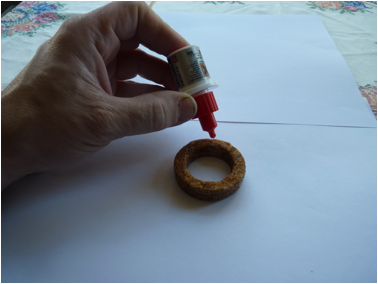
Here I
coat the float in super glue. Be careful not to glue yourself firmly to the
float or to glue your fingers together. Pick the glue carefully in the shop.
The small bottles that can be closed again are easier to handle and even though
one can be temped to use the gel-form of super glue you should really use the
thin floating kind as this penetrates the cork better and ensures that the
coating will be a thin layer.
The
super glue besides sealing for petrol also sort of secures the surface of the
cork and you should apply 2-3 layers. A 5 gram bottle seem to be sufficient for
one float here and please understand that it does NOT add 5 grams to the weight
on the float. Most will evaporate as it dries.
When
the coating is finished we can start checking the weight of the float. What is
important is how deep the float goes in liquid so it is more precise to say
that we need to check the weight/volume ratio. Even though petrol has a
different density than water we can still check much of how the float will work
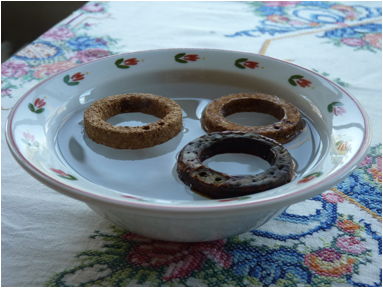
in plain water. On the picture you can see I have put in 3 floats in a bowl of
water : the original float, the new coated float and an un-coated one. Seen is
that it looks as if the coated float is precisely as deep into water as the
original. At this stage one can celebrate with a beer !
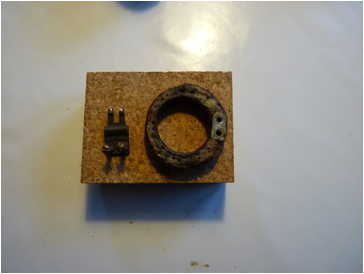
Before
we can install the needle valve activator we might need to re-drill the holes
because of the glue entering the holes. At this point of time I was a little
worried if the re-drilling of the holes has exposed cork to petrol by drilling
out all the super glue. As I did not want to coat the screws etc in super glue
as I feared it would make a road side repair difficult I used the nail polish
that survived the petrol test. So just covering the screws etc with this and we
are done with the remanufacturing of the float !!!

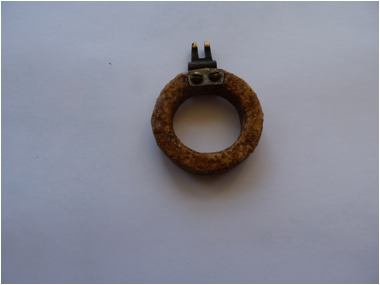
The
finished float ready to serve for a number of years, hopefully.
Any
questions/comments are welcome to :
Frank @
roedmose.com
(remove the spaces/blanks in the address. Only there to confuse
spam-robots J )
Denmark
2012